Friday, December 23, 2011

Laser Fun

I have stumbled across the wizard of all crafting tools: a laser cutter! I lucked upon the opportunity to use one through a friend. She has been using it to make jewelry and crafts of her own - check out some of the awesome things she has made:  http://www.flickr.com/photos/creativeninjask/

The laser can precisely cut and etch a variety of materials including paper, wood and plexiglass. The cutting is automated by a computer which reads drawing files. It's surprisingly simple to use and cuts quickly and flawlessly. So far, I have visited the laser twice. I showed up the first time with some simple materials and a few prepared drawings, curious as to what the laser was all about. Here is what I came away with:

Wood etching

Paper cutouts, intertwined

For my next visit, I wanted to craft something for the holidays. I decided to create a snowflake. Their beautiful symmetry, complex geometry, and perpetual uniqueness has always appealed to me. I also have a vivid memory from elementary school when we decorated large plastic snow flakes for the holidays. I always wanted to make my very own...


If my laser cutting has inspired or sparked your curiosity, check out the place I've been going to:  http://pagodaarts.com/ 
Let me know if you have any questions or aspirations of your own!

Happy Holidays with wishes of health and happiness.


Sunday, December 11, 2011

Cinque Cinque

When I was younger, I wanted to be an architect. I thought it would be fun to draw buildings. Once I learned that computer programs have more or less taken the place of hand drawn blueprints, I decided architecture was not my calling. Even still, I am attracted to the linearity of buildings. For this project, I knew I wanted to draw some type of buildings. I had planed to draw on inspiration from my travels in Amsterdam, where the buildings reminded me of the Victorians adorning the streets of San Francisco. At the last second, I changed my mind. I had a calling to draw a different panorama from my travels: Cinque Terre.


Cinque Terre, whose direct translation from Italian is 'Five Lands', is a string of 5 towns on the northwestern coast of Italy. Still somewhat out of the tourist's fray, these towns are beyond wonderful. During my time in Italy, I visited Cinque Terre. While there, we enjoyed pesto (Corniglia, the town we stayed in, claimed to have invented it!), met some great people, and hiked the trail that connects all of the villages. While each town sits right on the sea, they each have their own character and flair. I was struck by how the sea, sky, land and dwelling lay juxtaposed. I remember being inspired to draw this:


Riomaggiore

Manarola


I chose my medium to be the long lost art of colored pencils. I had not used colored pencils in years, so it was a nice revisiting of old ways. After studying the pictures above, I decided to learn perspective drawing. I taught myself the theory behind drawing in 1-point perspective, thanks to the help of wikihow.com and youtube.com. Below is a series of sketches leading up to the final piece...


Sunday, November 6, 2011

I AM.

Premise 
'I am.' - the shortest sentence in the English language. At some point over the course of my stellar Language Arts education, I learned this and was sure to never forget it. It is simple. I like it. Know you all now that words are not my forte, however they do fascinate me. In my opinion, poetry is one of the most stunning forms of art. The piece I am about to present to you can be seen as a derivative of poetry. Not only is this piece composed solely of words (with one minor exception), but it is also devoid of color. Both elements are very unlike my typical works of art.


Inspiration
A few months ago I was living around the corner from a gallery featuring art made by graffiti artists and the like. I frequented the gallery and not just because it was in the neighborhood; I have always appreciated graffiti art. In a way, it is my generation's rendering of fine art. Initial inspiration for my piece came from a series of pen drawings featured at the gallery. Each depicted a word that was made up of smaller words written in the ubiquitous and hardly discernible graffiti font. A couple of musing conversations later, I AM was created.


Process
The idea was to use one word adjectives as the building blocks of the three letters needed for the sentence in focus. The one criteria for these words was their ability to follow 'I am' and still compete a sensical sentence. I found it fitting to incorporate adjectives within the 'I' that describe me as an individual. The 'AM' composes itself with words that positively describe anybody. Many of the words are written or positioned in a way that represents their meaning.


Presentation
I: lucky, balanced, prudent, curious, independent, sm/art, humble, creative, shrewd, 24, shy, Paul Lowe Kirschner.


A: beautiful, growing, unique, alone, small, peaceful, 
infinite (symbol), home, eager, alive, ?, alone.
M: delicate, iridescent, special, content, free, 
complicated, !!, dreaming, ok, human, strong, love.


I AM.


Wednesday, October 19, 2011

Paniting, Part II: Figments

After some playing around in my new found world of painting, I decided to try my hand at more palpable objects. My days of smattering are not over, but I simply wanted to expand my horizons by trying to paint my figments. I knew that my first piece had to incorporate both simple colors and shapes. I found this to be a good starting point. Below is the initial rendering of my envisage:


I created this design with a balance of shape and color in mind. I used paper cut-outs and masking tape to aid in painting the shapes as true to their dimensions as possible. Even still, this proved to be tedious. 


SHAPE TONE


The white line is unpainted canvas and the only uninterrupted object. The blue ellipse was created with the method I documented in my first post. The yellow circle is that of the inner ring of the masking tape. I used a compass to create the green equilateral triangle. All of these are true colors except for the red square, which I achieved by mixing the orange with magenta. The last layer to be painted was the black negative space.


My second piece was initially inspired by PERMANENT DUSK. I liked the concept of having a horizon split the piece into two very different, yet related, scenes. My secondary inspiration is a picture I took while traveling through Arizona:


My piece ended up being more simple and surreal:


ROAD TO EVERYWHERE


I was so content with how the blue of the sky came out, I decided to skip the clouds. Similar to the sky, for the land I used a technique of fading in color on approach of the horizon. I continued to use my tape method for the lines of the road. All the while I painted, I enjoyed contemplating this composition's metaphorical implications. I will let you come up with your own, but please do share!


I am decently proud of my final works. Pablo would be too. 


Wednesday, September 14, 2011

Paniting, Part I: A Smattering

I knew this day would come...


... but I patiently pushed it off, as I waited for the right time and nerve. Once this day came, I knew a whole new world would be unlocked, which is a scary notion in any context. This day has arrived; I bought my first set of acrylic paints, a few brushes and some canvas board - so my humble journey begins.


In my first strokes I learned that there is SO much for me to learn: everything from how paint spreads with different brushes, how paint spreads on canvas, how it spreads over dry paint, wet paint, the way colors mix, how colors layer... and on, and on.  It took me a while to shift my mentality away from the detailed symmetry that typifies most of my work. Painting is exponentially more difficult than any other medium that I have used (colored pencil, marker, etc), which means it is that much harder to get right. I quickly gave up on even considering completing a piece in the way I fist imagined it.


I suppose this is the beauty of painting. Each piece is a one-of-a-kind work of art. In the very least, it is unlike any other painting and cannot be reproduced exactly. Paintings are composed of unique brush strokes, each stroke leaving its own finger print of paint. In making this realization, a weight was taken off my shoulders; the perfection of a painting arrives on a whim.


My first installment is of three paintings, each a smattering of strokes and color representing my very infant phase of painting. They are all done on 6"x6" canvas board using a 1" coarse hair brush. I felt obligated to don each painting with a trite title, while I also included a behind the canvas blurb from the artist.


MAGENTA MAR


This started with a square of magenta, 
the same paint used on the framed jigsaw. 
I wanted to play around with changing the 
hue by mixing black and white paint with 
magenta. What you see here masks no less 
than seven layers of paint below.


AQUA FLUSH


Similar to MAGENTA MAR, this mixes blue
with green and white. I have always been
drawn to this color combination, and I 
wanted to paint it. I really enjoy this
haphazard blending of colors.


PERMANENT DUSK


This is a continuation of my exploring
magenta and her hues. I originally set 
out to shade from black to white through
magenta. Instead, I ended with my first 
landscape painting.


In Part II I will work my way towards more concrete objects and colors. I hope you enjoyed.


NOTE: Commissions currently run free of charge.

Wednesday, August 24, 2011

Transcendentalism (Part 1)

Ever since learning about the progressive and rebellious philosophy in high school, I have been a big fan of everything Transcendental. In an effort to proclaim and solidify my place in the ways of transcendentalism (whatever that means), I undertook the endeavor of reading Thoreau's Walden. This was 5 years ago, and I am almost done with it! The reason for the delay: I allow myself to only read it while outdoors.

More recently, I came across a quote by fellow transcendentelow, Ralph Waldo Emerson:

Success

To laugh often and much;
To win the respect of intelligent people
and the affection of children;
To earn the appreciation of honest critics
and endure the betrayal of false friends;
To appreciate beauty,
to find the best in others;
To leave the world a bit better,
whether by a healthy child,
a garden patch or a redeemed social condition;
To know even one life has breathed easier
because you have lived.
This is to have succeeded.

I found this to be poignant in the sense that it cast an affable light on success. It speaks nothing of monetary compensation or notoriety, but instead focuses on virtuosity. 

I have always strongly believed that quotes such as these should be cheesely adorned and hung on the wall where it can be read by everyone, everyday. So...

I first created a base template I could trace over:


I then tried my hand at different designs. Here are a few I came up with:


In the end, I satisfied my vision of a cheesy wall hanging, however I remain unsatisfied with my end product. I restricted myself with a narrow vision and as a result, I bound my creativity.


This is part one of two. Look forward to another transcendental quote (and hopefully work of art) in the near future.


Sunday, June 19, 2011

Jigsaw

I love puzzles. I am not sure why, but I do - always have. I enjoy all types of puzzles, but most especially jigsaw puzzles. I have fond memories of being a kid and doing jigsaws of white wintery wonderlands along with my family in front of our wood burning stove. We never looked at the box showing the finished picture. Really, this is what makes a jigsaw a puzzle. 


A more resent enjoyment of mine pertains to another type of jigsaw - woodworking. For the past few years I have had aspirations to build and craft things out of wood. Only recently have I begun to produce; after working with a carpenter for a few months, I learned some skills and gained confidence in my abilities to yield a saw and other tools of the trade. My first creation was a shoe rack, something I am very proud of. 


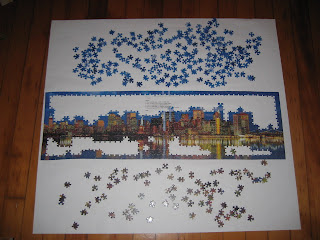
My most recent project melds a jigsaw and woodworking (however, no jigsaw was used) together into one piece. I had a hankering to do a puzzle, but did not want to take it apart and box it up afterwards. I decided it would be fun to find a puzzle that I could custom build a frame for. So this is what I did.


Step 1. Assemble
I bought a puzzle depicting the skyline of New York City. The initial reason for this picture was my infatuation with the view. I have been through NYC a number of times over the past few years, and I find the skyline of the iconic city to be breathtaking. Additionally, both of my parents grew up in New York City, so my roots partially reside there. While I worked on this project, I amused myself with how my love for puzzles comes from my mom's side, while my paternal grandfather was a superb carpenter.


As always, I started with the boarder... and that is the only secret of my puzzle making technique I shall divulge. I will admit that the puzzle took longer than most. A majority of the time was in completing the sky, which was embarrassingly tedious.


Once complete, I glued it together with Mod Podge, which is A+mazing. Not only did it nicely glue the pieces together, it gave the puzzle a great textured, glossy finish. I then glued the puzzle to a thin wood sheet for support.


Step 2. Build
Nearing completion of the jigsaw, I started the frame. I had never built a frame before, nor did I have any clue how. This is usually the way most of my projects begin, however I did have a solid idea of what I wanted. I bought decorative wood molding that would become the frame. With the help of a very handy and talented friend we made the necessary measurements and cuts to fit the frame to the jigsaw. After two rounds of glue and reinforcement, she was ready to be dolled up. 


I went to my local art shop (BLICK, new favorite - sorry Michaels) and bought some acrylic paint. I chose Magenta, which was a bold move. The way I looked at it was this: most frames are intentionally bland, as to not captivate attention away from what is framed within. For my piece, I wanted the captivation to be equally weighted between the frame and framed.


Step 3. Meld
Finally, the jigsaw and frame came together as one...


I am happy with how everything turned out. Now this will probably never hang in a museum of fine art because it is a $15 jigsaw puzzle, and the frame is more or less from Home Depot, but I am OK with these things. More than anything, it was nice to be able to turn my jigsaw hankering into a decently fashionable piece of art. I thought the Magenta did its job in calling attention to itself, but at the same time complimenting the inlaid cityscape. 


From assembling the puzzle to building and painting the frame, I really enjoyed this project. A HUE thanks to Tom for being incredibly helpful in lending me his time, resources and expertise. Until next time, enjoy the view!

Thursday, April 28, 2011

Liquid Art

A friend shared this with me, and I just had to share:


It left me with out words - WOW, too cool. This blows my 'Liquid Art' experiment out of the water...

UPDATE: My current project is taking longer than I thought, but it is coming a long. I hope finish it up in the next two weeks, and move on. Until then, do what you do.

Tuesday, March 29, 2011

Water's Color II

Blue is a one of a kind color. However, there is a whole rainbow of other colors out there. Technically speaking, there is an infinite number of colors. Light is a spectrum, and only a small part of this spectrum (wavelengths between 390 - 750 nanometers) can be seen with the eye. Having bought a pack of food coloring containing blue, but also green, red and yellow colors, I just could not resist myself from expanding my water's color project.

Let me first give another shout out to my girl The Container Store. I was able to get these amazing (at least in the eyes of a pack rat -- thanks Dad) acrylic boxes in varying shapes and sizes. While I was at it, I figured I would make two rainbows. So I bought two different petite boxes, 7 of each. As for the colors, I had 4 already taken care of, as denoted by the capitols: RoYGBiv. This left me needing to concoct orange, indigo and violet. Orange was pretty straight forward. Indigo and violet were a little harder, particularly in deducing the ambiguity between the two. I discovered that indigo is purple with a tinge of blue, while violet is purple with a tinge of red. As far as I was concerned, a  'tinge' meant a fraction of a drop of food coloring.

Without further ado (more like I-do, or Idid), Rainbow I:

Rainbow II:

And the whole family of water's color:


I hope you found this project enjoyable, educational and inspirational.


Until next time, all the best,
-PabLowe

Wednesday, March 23, 2011

Water's Color

My years of youth taught me a lot about life; at the same time, my years of juvenile joviality filled me up with many useless facts. One such fact: a singular drop of blue food coloring in 250ml of a transparent liquid (i.e.: water) will exactly match the color of Listerine. 


In what manner did I stumble across this discovery? Simply to save my mother any more rolling of her eyes, I plead the fifth. Anyhow, my discovery sparked a creative inspiration that has been swishing for the past 6 years.

Pure water's color is a pale blue. Small amounts of water appear transparent. The larger the body of water, the easier it is to see water's true blue color. Depending on the atmospheric conditions and other factors, water's color can vary from a dull blue to a vibrant blue. Lately, I have been attracted to the color blue and its hues. This is one of the driving forces behind me finally undertaking this project, not to mention the fact that I love water. Quite frankly (and again, spare my mother the details), I'm addicted to the stuff!

The first step was to find the right container to house my water works. I was picky with this because I have been sitting on an ingrained envisage for years. I needed to fulfill my vision. For the first time ever, Michael's hobby shop failed me. I always checked the glassware isle during my frequent visits, and not once did I find what I was looking for. Just as I was getting desperate, The Container Store stepped in to save the day. Blue food coloring was easy to find. Water - even easier.

Now, finally fully equipped, it took me about an hour to complete my project. During the process I got side tracked at the beauty of a singular drop of food coloring in still water.


I also discovered that the water's temperature changes the way the coloring disperses itself. For those of you more savvy than I with cameras and editing, feast yourself (and share with me your results :-).

Finally, my finished project.


I hope you enjoyed. Part II is in the works...

Sunday, February 20, 2011

Knots and The Ellipse II

First, let me get this over with... the answer to my math problem:

The intersection of a circle centered at either end of the minor axis' radius (the intersection of lengths A and X) with a radius of the length of the major axis' radius (length B), and the major axes would be the precise locations of F1 and F2. That seems complicated (because words like to be), but graphically, what this says is X=B (!!).

How?
I + II = B
2*I+4*II = 2*X+2*II (learned from the 'string construction' method)
2*I+2*II = 2*X (learned from Algebra 1 in 7th grade)
I + II = X = B

Who cares?
It makes finding the foci of an already drawn ellipse very easy, which was my initial dilemma. Cool, I hope you enjoyed this as much as me :-)

Now, down to the point - my knot. The first thing I did was figure out how large I could make the knot with the twine I had bought. Once I figured this out, I made a to-size elliptical layout of the knot on a piece of paper. I then strung the first pass of the knot...

Getting this right took some time and was not easy. The next step entailed tracing the overs and unders with the long piece of rope. I was able to trace the first pass three more times before the long end ran out. I was left with some slack within the knot...

The last step was cleaning up the slack and finishing the knot. This task was not hard, but took a good amount of time. I was able to get one more pass in, finishing with a 5 ply knot, as seen here:

I changed the orientation of the knot for two reasons. Firstly and from the beginning, I planned on using the plat as a door mat. It might be a little small, but we will make it work. Secondly, the knot came out not quite symmetrical. This frustrated me at first, but then I concluded this enhances its functionality; the top edge is flat, which will conveniently rest against the foot of the door. For those of you who were expecting this piece to be mounted on a wall and admired as such, I am sorry. Some times art can be functional as well!

Thanks for looking and listening, and stay tuned...

Saturday, February 12, 2011

Knots and The Ellipse

I have always enjoyed figuring things out, be it solving a math problem or untying a knotted bundle of jewelery. Over time, I became quite good at both tasks. Recently, I have had the drive to dive a little deeper and be the creator of such great things; yes, I am still talking about math problems and knots...

In college I worked on a ropes course where we had to learn a number of practical knots. To help expand my knowledge on the subject, I bought a book about knots. After learning to tie some of the obscure and fun to tie knots (ie. the monkey's fist), I found myself oggling over the useless but pretty decorative knots. I made one for my girlfriend, seen here:

Recently I have had my eyes on another decorative knot. The book calls it the Ocean Plat. It is a little more of a complex knot than the one above, and is elliptically shaped. Circles are simple in construction, they have a center and radius. Ellipses are harder to construct, they have two foci and a variable radius. In geometry class we learned how to construct an ellipse with two pins acting as foci and a string whose ends are tied together in a (useful) knot. For those interested, here's a video showing this procedure: http://www.youtube.com/watch?v=7UD8hOs-vaI. About a year ago I used this method to construct an ellipse, or oval, and then proceed with the method of creativity to fill in the empty space within. I called this piece 'Ovalation", seen here:

DISCLAIMER: For those of you who get queezy at the notion of math and algebra, please skip to the end of this post.

In mentally preparing for the Ocean Plat, I got distracted by the ellipse - such a dubious thing. It dawned on me that I could not find the foci of an ellipse that was already drawn. This dilemma did not really pertain to the construction of my knot, nor much else, yet I just needed to know how to do this. Here is the problem I made for myself: if you know the lengths of the radii along the major and minor axes (A & B) of an ellipse, can you find the location of the foci (F1 & F2)?

It took me a while to conclude that yes it is possible to find the foci. All you need to know is the theory behind how ellipses can be constructed, as seen in the video above. I found the measures I and II helpful. Hint: Solve for X. I'll give you (that is if there are any of you reading this) until my next post - in a week - to try to figure this out. I'd like to think an 8th grader has enough deductive reasoning and algebra skills to solve it, but do not let that hold you back...

As for the knot, last time I was at the Home Depot I bought 50 feet of sisal twine rope, 3/8 inches thick. This is all I will need - oh, and a little math :-)

Monday, January 17, 2011

Dragon Dance

I started my first art project on January 1st by drawing a few lines in my sketchbook. My vision for this piece is a Dancing Dragon. I am drawing inspiration from something I saw in The British Museum in London, seen here:

I think this is a fitting project to start with. Having derived my inspiration during traveling last year, I will be able to bring those things I learned and saw into this new year. Another way I find this fitting is because the dancing dragon is a symbol the Chines use to celebrate their new year. I will try to incorporate balance, elegance and stability into my piece. At the same time, I wish to find a similar poise within my life.

In the beginning.

Like many people, I enjoy when the time of year comes around to make new resolutions. However, unlike many of these people, I take my resolutions seriously. If I resolute, I do so resolutely. In years past, my resolutions have generally consisted of simple tasks or abstinences. Most notably: giving up Snickers, my absolute favorite sweet, for a year. I learned the art of discipline that year. 

For this new year, I have decided to do something more productive. My resolution is to continuously have at least one art project in progress at any point in time, AND complete a dozen projects over the course of the year. This blog will not only allow me to share my progress and results, but also motivate me. Each time I initiate a project, make headway, or complete a project, I will make a post. Feel free to check in on my progress throughout the year!