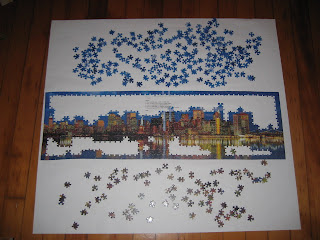
I love puzzles. I am not sure why, but I do - always have. I enjoy all types of puzzles, but most especially jigsaw puzzles. I have fond memories of being a kid and doing jigsaws of white wintery wonderlands along with my family in front of our wood burning stove. We never looked at the box showing the finished picture. Really, this is what makes a jigsaw a puzzle.
A more resent enjoyment of mine pertains to another type of jigsaw - woodworking. For the past few years I have had aspirations to build and craft things out of wood. Only recently have I begun to produce; after working with a carpenter for a few months, I learned some skills and gained confidence in my abilities to yield a saw and other tools of the trade. My first creation was a shoe rack, something I am very proud of.
My most recent project melds a jigsaw and woodworking (however, no jigsaw was used) together into one piece. I had a hankering to do a puzzle, but did not want to take it apart and box it up afterwards. I decided it would be fun to find a puzzle that I could custom build a frame for. So this is what I did.
Step 1. Assemble
I bought a puzzle depicting the skyline of New York City. The initial reason for this picture was my infatuation with the view. I have been through NYC a number of times over the past few years, and I find the skyline of the iconic city to be breathtaking. Additionally, both of my parents grew up in New York City, so my roots partially reside there. While I worked on this project, I amused myself with how my love for puzzles comes from my mom's side, while my paternal grandfather was a superb carpenter.
As always, I started with the boarder... and that is the only secret of my puzzle making technique I shall divulge. I will admit that the puzzle took longer than most. A majority of the time was in completing the sky, which was embarrassingly tedious.
Once complete, I glued it together with Mod Podge, which is A+mazing. Not only did it nicely glue the pieces together, it gave the puzzle a great textured, glossy finish. I then glued the puzzle to a thin wood sheet for support.
Step 2. Build
Nearing completion of the jigsaw, I started the frame. I had never built a frame before, nor did I have any clue how. This is usually the way most of my projects begin, however I did have a solid idea of what I wanted. I bought decorative wood molding that would become the frame. With the help of a very handy and talented friend we made the necessary measurements and cuts to fit the frame to the jigsaw. After two rounds of glue and reinforcement, she was ready to be dolled up.
I went to my local art shop (BLICK, new favorite - sorry Michaels) and bought some acrylic paint. I chose Magenta, which was a bold move. The way I looked at it was this: most frames are intentionally bland, as to not captivate attention away from what is framed within. For my piece, I wanted the captivation to be equally weighted between the frame and framed.
Step 3. Meld
Finally, the jigsaw and frame came together as one...
I am happy with how everything turned out. Now this will probably never hang in a museum of fine art because it is a $15 jigsaw puzzle, and the frame is more or less from Home Depot, but I am OK with these things. More than anything, it was nice to be able to turn my jigsaw hankering into a decently fashionable piece of art. I thought the Magenta did its job in calling attention to itself, but at the same time complimenting the inlaid cityscape.
From assembling the puzzle to building and painting the frame, I really enjoyed this project. A HUE thanks to Tom for being incredibly helpful in lending me his time, resources and expertise. Until next time, enjoy the view!


